Tuesday, September 24, 2013

Fall Planting

I really do love this time of year.  It's still busy but not crazy busy like the vegetable garden and fruit orchards keep me from late July to early September.  I'm about ready to put the canner kettles away; the cold room shelves are full.  The cool, crisp nights lead to good sleeping weather. 

There are still things to do, though.  It's not too late to plant deciduous trees and perennials, although the latter will need some mulch for the winter.  My planting season has been cut short by an injured foot, but I did manage to move some tree seedlings from places they'd planted themselves but weren't welcome.  I can still always find room for these little treasures and sometimes I'm even lucky enough to just be able to let them grow where they land.

I also managed to remove the perennials I've used for containers throughout the summer and find places in the gardens for them.  I can feel better about tearing those containers apart at the end of the season when I know that I will be able to enjoy those plants in a new setting next year.

In North Dakota, fall is a great time to do planting.  The roots of the transplants need about six weeks of ground temperatures above 40 degrees to become well-established.  The ground temperatures cool much more slowly than air temperatures, so here we can generally plant through the month of September and oftentimes into early October.  Bulbs and dormant deciduous trees can be planted almost till the ground freezes.  Evergreen trees and shrubs should be planted by the end of September for them to be established well enough to survive the winter.

Fall transplants love the cooler temperatures - there is much less stress on the plant, allowing for better root development.   Often, moisture becomes more abundant again as we move into fall, and the cooler days and much cooler nights keep the moisture in the soil longer.  There are fewer diseases and pests to plague the tender transplants in fall.  While the plant may look a little worse for the wear this year (it may even look dead, but resist the urge to pull it out), it will reward with lush foliar growth next spring because of the vigorous root development that took place the preceding fall.

Another advantage of fall planting is the prices.  Many garden centers don't have the resources to overwinter plants, so they clearance them as fall approaches.  The later it gets in the fall, the lower the price goes.  Last year, I picked up several nice viburnums for $1.00 a piece - their original price was $19.99.  True, I had to really use my imagination to see the glory that could be coaxed out of their bedraggled little selves, but with a little trimming, some TLC, and fall planting, I had some beautiful new shrubs this year.

Just as it is with spring planting, adequate watering is critical.  The new transplants need to have a half to one inch of water each week right up until the ground freezes.  Then a three to four inch layer of mulch to protect the crown of the new plant from the freeze and thaw cycles of winter, and the scene should be set for a nice new planting to emerge in the spring.

Thursday, September 12, 2013

Tomatoes and Blights

You can definitely feel autumn in the air.  Mornings are crisp and cool, but not so cool that you can't be outside in your shirtsleeves  - or pajamas.  :)  The days are warm, but not too warm; and the nights are just perfection.  I love this time of year - as long as I don't think about what's right around the corner.

Fall is a busy time in the gardens.  The vegetable and fruit gardens are putting on their last hurrah.  One picking of tomatoes yielded 14 quarts of crushed tomatoes, 10 quarts of spaghetti sauce, 12 pints of garlic-basil-tomato sauce, 15 pints of salsa and 12 quarts of tomato soup.  Plus about 60 pounds of tomatoes given to friends and family.  I really hope next spring when I am too tender-hearted to throw away those extra tomato seedlings, someone reminds me of this season's excesses!

This over-achieving production is in spite of having some problems with tomato blight.  It appears that there may be a variety of blights attacking my tomato plants this year.  That's one of the dangers of a wet growing season, and of growing tomato varieties that aren't resistant to the various tomato diseases.  I am pretty attached to my Sheyenne and Cannonball tomatoes that were developed by North Dakota State University specifically for success in our North Dakota soils and growing conditions, so I am willing to take the risk on blights.  My brother, who was one of the recipients of some of the excess this year, said these tomatoes made the best tasting salsa he's ever had.  I happen to agree with him - they are firm, meaty tomatoes with a rich, tomato taste.  People who choose to grow heirloom varieties of tomatoes feel the same way about their tomatoes - the benefits of those varieties make them worth the extra trouble and the risk of blights. 

Early blight (internet photo)
Early blight is caused by the fungus Alternaria solani.  It comes from the soil and starts attacking the lower leaves of the tomato plant.  The first indication is usually some large, irregular brown spots which appear on the leaves and may have lighter, yellow spots in the center.  Eventually the entire leaf withers, dies and falls from the plant.  The fungus also infects the fruits, causing dry, leathery sunken spots near the stem end.   The dying off of the leaves makes the tomatoes prone to sunburn because they lack the protective foliage cover.   If this blight occurs early enough in the season, it can decrease the vigor of the plant and diminish production for the year.  (As you can see above, that was not a problem with my tomatoes this year.)

Septoria leaf blight, caused by the fungus Septoria lycopersici, occurs later in the growing season.  It makes its initial appearance as small yellowish-tan blotches on the leaves, with a dark halo around them.  They are smaller than the spots of early blight and are more regularly shaped.  They may have dark spots in the center of the lesions, called "fruiting bodies".  Infected leaves generally drop from the plant, again leaving the tomatoes susceptible to sunburn and rotting.  Spots may also appear on the stems and the blossoms, interfering with fruit production.

Late blight is caused by the pathogen Phytophthora infestans, which is classified as a "water mold"This pathogen attacks both tomatoes and potatoes.  In fact, its greatest claim to fame is the Irish potato famine during the 1840's.  It makes its appearance on tomatoes as regular or irregular oily looking spots.  A distinctive difference between late blight and other blights is that while early and Septoria blight attack the lower, older foliage first, late blight attacks the plant from the top down, affecting the youngest foliage first.  Late blight also more readily attacks the fruit, causing dark, mushy lesions, which may be more pronounced at the stem end of the tomato, but eventually cover the entire tomato.  The rotting tomato emits a distinctive, foul odor.  I've found that while you can trim out affected spots on tomatoes affected by other blights, tomatoes affected by late blight often have a nasty taste throughout the entire tomato.

As with all fungal infections, prevention is the best cure.  Good air circulation goes a long ways toward preventing fungal and mold diseases.  Remember those little seedlings I couldn't bear to throw away?  Well, at Wiese Acres, I have a limit to the space in my vegetable garden.  So, my tomatoes ended up a little more crowded than they should have been this year.  Strike one for my tomato plants.  Then, my tomato foliage went crazy and I didn't take time to properly prune the plants to keep them from completely overfilling the tomato cages.  Strike two.  Then, we had days and days of rain and even when it wasn't raining, we had cool, damp, gloomy weather.  Strike three!  And I had blights. 

Once any blight appears, if it is not extensive, you can gain some control by pinching off the affected  leaves and destroying them, then spraying the plant with a fungicide to prevent or at least slow further infection.  Chlorothalonil or mancozeb are effective against the blights, or for an organic solution, copper based sprays may provide some control.  Fungicides are more preventive than curative, so it's best to spray before any symptoms occur.  I'm a sort of "just in time" gardener, though, so it usually doesn't occur to me to spray fungicides before I have fungal infections. 

It will be critical to clean all the infected foliage off the garden and destroy it.  This debris definitely doesn't belong in the compost pile.  It will either be bagged and taken to the landfill, or it will be burned.  Next year, I will need to be careful to not plant any plants in the nightshade family (tomatoes, potatoes, eggplant, peppers) in the same area, as the spores of the fungus can overwinter in the soil.  I'll need to make sure that I don't overcrowd things next year, and if I irrigate, ideally, it can be done with a drip system.  If overhead irrigation is my only choice, it will need to be done early in the day when the leaves won't stay wet for extended periods.  I'll also check the nutrients in my soil.  Blights are much more likely to attack plants that are less vigorous and proper fertilization is one way to foster good, healthy plants.  I'll also place some mulch around the base of the plants as the mulch may stop any spores that may still be in the soil from splashing up onto the foliage and setting up housekeeping.

On a positive note, I did not have any blossom end rot.  I save my egg shells for several months leading up to planting time, crush them, and sprinkle a handfull in the bottom of the planting hole.  This supplies needed calcium for the tomato plants.  In addition to having the calcium available to them, though, they need to have even, consistent moisture to allow the calcium to be absorbed into the plant and fed to the tomatoes.  One or the other alone may not prevent blossom end rot, but the two together is just about a guaranteed prevention.

So, I've learned a few things to not do with tomatoes this year.  As I think about my aching feet and look at my reddish tinged hands, I can't help but think that throwing away those extra seedlings might just be the most important lesson, though.

Tuesday, September 10, 2013

Daylilies Diseases and Pests


Daylilies are usually pretty disease and pest free, if planting conditions allow for good drainage and the soil contains a good supply of organic matter.  The biggest problem I see when people tell me their daylilies aren’t “doing well” or aren’t flowering is that the daylily is planted too deep.  That crown should not be covered with more than one inch of soil.

But, just like sometimes even the toughest of us get sick, so sometimes do daylilies. 

Leaf streak (internet photo)
A common fungal disease of daylilies, especially the last couple years when we’ve had cool, wet weather, is Leaf Streak.  Leaf Streak is a fungal infection that causes yellowing along the central leaf vein, followed by brown streaking.  The yellowing usually begins at the tip of the leaf and follows the leaf downward towards the crown, leading to browning, drying out, and eventually death of the entire leaf. 
 

Prevention is the best cure, if possible.  When Mother Nature delivers the moisture, we don’t have much control over when or how it hits our daylily leaves. When we are delivering the water, we can be a bit more particular.  A drip system that delivers water directly to the soil without wetting the daylily leaves is the best way to irrigate.  If the only option is to water in a way that wets the leaves, it’s best to water in the morning when the sun and breeze will quickly dry the leaves.  When the daylily leaves are wet, whether from rain, irrigation, or dew, resist the urge to walk amongst them and admire their flowers and foliage.  The more we disturb the leaves when they are wet, the more opportunity we give fungi to set up housekeeping. 

Once the infection is evident, good housecleaning is essential.  Remove and destroy affected leaves.  These leaves do not belong in the compost pile – they should be bagged and put in the garbage.  Affected plants should be isolated from others if at all possible.  

It is difficult to “cure” a fungus once the symptoms appear, but spraying with a fungicide may slow development of the disease and prevent new growth from becoming infected with Leaf Streak.    Fungicides which have proven effective for Leaf Streak are thiophanate-methyl, mancozeb, chlorothalanil, and iprodione.   These are all marketed under various trade names, but if you look at the “active ingredient” on the label, one of these should be the top ingredient. 

The entire plant should be “doused” with the fungicide, upper and lower surfaces.  If your daylilies had Leaf Streak last year, it might be a good idea to prophylactically spray the new foliage right away in the spring, before any signs of disease.  Spraying every couple weeks during the growing season might be necessary to keep it under control.


Spring Sickness is considered a “mystery” disease – its cause is not known for sure, but it is definitely more prevalent in those areas where there are freeze / thaw cycles.  I’d never heard of this disease before the spring of 2012.  That spring, instead of my nice, bold, strappy daylily leaves, I started noticing that the leaves were growing sideways, twisting and turning every which way, sometimes ending up in a twisted mass in the center of the clump.  In addition, some of the leaves had jagged, brown edges. 

What in the world was happening?  I couldn’t see any signs of pests that might be causing the problem, no mechanical damage (e.g. no one had gotten close to them with the lawnmower or weed whacker), and no signs of fungal or bacterial infection.   So, I started doing some research and discovered “spring sickness”.  The winter of 2011 – 2012 was non-existent in North Dakota.  Most people were rejoicing in our winter with very few days below freezing and even 80 degree days in March, but we gardeners were already concerned about what this meant for our perennials.  The spring sickness in our daylilies confirmed that temperatures should just not be high enough to wear shorts in February in North Dakota. 

Spring sickness may also be caused by mites or some type of fungal infection, but in my daylilies, those not affected as severely, outgrew the problem by mid-summer and went on to bloom beautifully that year.  Those more severely deformed were just fine the spring of 2013, leading me to believe that it truly was our bizarre non-winter that was the culprit.

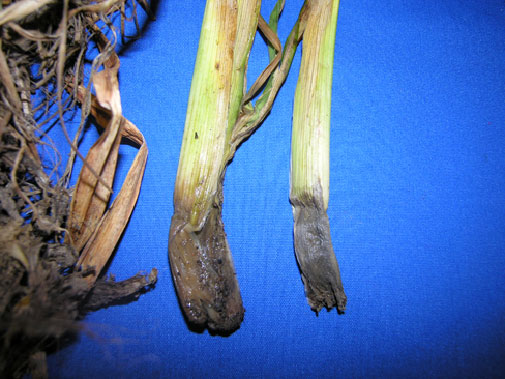
Bacterial soft rot is often caused by the bacteria Erwinia carotovor.  Symptoms are a soft, mushy crown and roots, often accompanied by a strong, foul odor.   Erwinia is a bacteria that is present in most soils but it doesn’t cause any problems until conditions are just right.  High temperatures, poor air circulation, poor drainage and improper fertilizing are friends of soft rot.   In these conditions, it spreads very rapidly and once soft rot becomes noticeable on the daylily, it might be too late to salvage.  If caught early enough, the daylily might be salvaged by digging it up, cutting out any affected parts, soaking the remaining part of the clump in a 10% bleach solution for 20 minutes, letting the cut surfaces dry, then re-planting in a well-drained area.

White mold is a crown rot caused by the fungus Sclerotium.  The crown of the daylily becomes covered with white, cottony looking growths.  Sometimes small, black seed-like growths are evident in the cottony growths.  There are no fungicides effective against sclerotia.  Treatment is to remove the daylily and the soil surrounding the plant for one foot beyond the root ball and one foot deep.  Both the daylily and the soil should be bagged and discarded.  Sclerotia lives in the soil for many years, so it is important not to compost any part of the plant or use the affected soil in other garden spots.
 
Rhizoctonia crown rot is another disease of daylilies that occurs in wet years, or in areas with poor drainage.  The crowns rot from the soil surface down towards and into the roots.  There is usually a dark, heavy growth on the crown of the daylily that almost looks like a piece of cloth or heavy felt wrapped around it.  Unfortunately, like the other crown rots, there is no treatment once the rot is established.  The only hope is to catch it soon enough that you can salvage some of the clump through the pruning and soaking method described for bacterial soft rot.

Pests of daylilies hardly bear talking about, in my opinion.  I have rarely, if ever, had much problem with insects.  Even slugs, those dirty little slimeballs, rarely do much damage to daylilies.  Cutworms, cucumber beetles, Japanese beetles, grasshoppers and bulb mites may cause some periodic damage, but usually not of much significance. 

Spider mites are the most common pest of daylilies, especially in hot, dry weather.  Spider mites cause yellowing of the leaves, sometimes with tiny brown spots amongst the yellow showing where the mite began sucking the clorophyll from the leaves.  The webbing is sometimes visible, especially on the undersides of the foliage, and you may even see the mites moving in the webbing.  Usually a strong spray from the garden hose or spraying with an insecticidal soap will do the trick. 

Thrips may infest daylilies and cause streaking on the leaves and buds.  They often cause deformities in the petals, leading to an unsightly flower.    There is a specific aphid that feeds only on daylilies and isn’t controlled as easily by a hosing off with plain water as most aphids, because they get deep into the folds of the foliage.  Both thrips and aphids are best controlled by a systemic insecticide if the infestation is severe.  A common systemic insecticide, dicofol, marketed as Kelthane, Hilfol, or Acarin should not be used on daylilies, as it can damage the plant.  Other systemic insecticides should be safe for use, but please keep in mind that systemic insecticides are not selective to thrips or aphids – if a butterfly or bee stops to sip the nectar from your daylilies, it will kill them, too.  In most cases, the pest problems are not severe enough to warrant these “big guns”, in my opinion.

It is really hard to find a more carefree plant than a daylily and they give so much beauty and diversity to the garden, it’s hard to go wrong with them.


Tuesday, August 27, 2013

Dividing Daylilies


Daylilies are tough, dependable workhorses in my garden.  They are very low maintenance and every few years, they generously provide new plants I can use to fill spaces in my own garden or give to friends.  

There is no magical time to divide daylilies.  Technically, any daylily that has two or more fans can be divided to obtain one or more additional daylilies.  As I mentioned in an earlier blog, though, the harder you divide them, the longer it takes for them to bloom again. 

So, when is it necessary to divide daylilies?  The general rule of thumb is that if the daylily is in optimal growing conditions, e.g. full sun if it is one that requires that, soil rich in organic matter, etc., and it isn’t blooming its best, it might be time to divide it.  Another indication that it is time for some dividing is when the foliage in the center of the clump becomes thin and straggly, along with fewer flower stalks and less blooms per stalk. 

Daylilies are tough as nails, so they will survive dividing and transplanting virtually any time.  The best time, though, is shortly after they finish flowering in late summer or early fall.  Here in North Dakota, I usually like to have my daylilies divided and re-planted by mid-September at the latest.  That gives them time to get their roots established before the ground freezes for the winter.

Daylilies can develop some pretty massive root systems and may require some muscles to get the root ball lifted so it can be worked with more easily.  It’s easier to do this if you clear away mulch, leaves, and other encroaching plants first.  I also trim the foliage back to about 6 to 8 inches, so that it isn’t flopping around and in my way.  Then, with a sharp spade, I dig straight down about 10 to 12 inches from the outer crown of the plant, doing this completely around the clump.

Once I’ve loosened the soil with the spade, I either use the spade or a garden fork to lift the clump from the ground, knocking off as much loose dirt as I can so it’s easier to lift.  I set the large clump to the side of the hole and then, again using either the spade or the garden fork, slice down through the center of the clump, dividing it into two parts. 

Now, here I have a confession to make.  I know a lot of people tell you to carefully tease the root clump apart to avoid damaging the roots.  Here’s my confession – I don’t baby my plants.  And, I think most people who have seen Wiese Acres will tell you that my plants don’t really seem to mind that.  So, I’ve been known to take my sharp spade, set it in the center of the clump, and give it a good whack right down through the middle of the clump. 

After the “whack”, I remove any roots or tubers that are badly mangled, or any that are mushy, shriveled or look otherwise unhealthy.  If it’s a very large clump or if I want a large number of divisions, I’ll more gently divide it down further, to about three to four nice sized fans. 

Only if it is a young daylily that has a small root clump and I'm dividing it just to get an additional plant, do I use the gentle teasing apart of the roots method to preserve the majority of the root ball. This is most easily accomplished using two garden forks to "wiggle" down between the roots to separate them, and then gently pulling the clump apart.
 
The next step I will take is to rinse the old soil off the root ball with a garden hose.  Then I soak the roots and tubers in a 10% bleach solution (1 cup bleach to 10 cups water) for about 10 minutes before re-planting.  With all the spring moisture of the past couple years, my daylilies have been prone to some fungal diseases, such as leaf streak.  The bleach solution may (or may not) help give them a fresh start in their new home.  Sources differ in their opinions on the value of the bleach soak, but bleach is cheap and 10 minutes isn’t very long, so I figure “why not?”

Then I plant the divisions just like I plant new bare root daylilies; water them in; give them a little TLC for the first few weeks; and place a 3 to 4 inch layer of wood or straw mulch around to protect them from the freeze and thaw cycles of winter.  Then I sit back and wait for next year’s glorious show!


Thursday, August 22, 2013

Planting Daylilies

Now that we know the terms to describe the blossoms, colors, foliage types, and more, we’re almost ready to start planting daylilies, whether they are divisions from a friend, bare root from a supplier, or potted from the local garden center.  Before we start, though, there are just a few more terms it will be helpful to know.

Daylilies grow from long, thin, fibrous roots, which over time thicken into spindle-shaped tubers.  These thick, fleshy roots absorb and store water and nutrients to feed the foliage and blossoms of the plant.

The crown is the solid white core of tissue that joins the leaves and the roots of the daylily plant.  The crown produces the leaves from its upper surface and the roots from the lower surface.  Most daylilies must have a crown with each propagated piece to be able to establish a new plant.
 
Daylily leaves are grass-like with a center rib that is prominent on the underside of the leaf.  The leaves are attached opposite each other on the crown and form a fan.  Multiple fans form a clump.  Daylilies can be divided down to a single fan or left with multiple fans in a clump.  The more fans left in the clump, the sooner the daylily will bloom again, but also the sooner it will need to be divided again. 

 Finding the right location for the daylily is important.  Most daylilies prefer full sun, although more and more cultivars are being developed to tolerate part shade.  Light yellows and other pastel colors need full sun to show their best colors.  Darker colors, like reds and purples, may benefit from partial shade, particularly from the hottest mid-day sun.  These dark colors have a tendency to lose their vibrancy when exposed to the hottest sun.  Too much shade, though, will keep the daylily from blooming its best and may cause the foliage to become limp and floppy.

Daylilies are not particular about soil type.  In fact, daylilies are great in my heavy clay soil because the thick roots and tubers act as “clay-busters”.  They are said to prefer a slightly acidic soil, but they thrive in my highly alkaline clay.  They do require a location with good drainage and they like to have a fair amount of organic matter in the soil around them.  I top dress mine with a couple inches of composted manure at least every other spring.   (Top dressing is simply a matter of spreading the compost over the top of the existing soil around the crown of the daylily).

Daylilies prefer evenly moist soil, but are quite drought tolerant once established.  About the only thing they really don’t like is too much moisture.  In extreme conditions, the tubers can rot.  In less extreme, but still too moist, conditions, they are prone to fungal diseases such as leaf streak, white mold, or Rhizoctonia crown rot.  Bacterial soft rot can destroy the daylily if the soil remains too wet.  We’ll talk about controlling diseases of daylilies in another blog.

Daylilies can be planted anytime that the soil is workable, e.g. anytime the soil isn’t frozen solid.  They tend to do their best if planted in early spring, while moisture is more abundant and temperatures are a little cooler.  I have successfully planted daylilies, though, in the hottest part of the summer – the key is to give them a little extra tender loving care in the form of good, even moisture and a little mulch around the planting area to help keep the roots cool.  Daylilies planted in late fall need protective mulch covering them for the winter in harsher climates.

Daylilies  should be planted in a hole that is large enough to hold the roots without twisting, bending or crowding them in any way.  It may be helpful to mound the soil in the middle of the planting hole, then set the center of the crown on the mound and spread the roots down the side of the mound.  This helps assure that the roots stay straight and uncrowded when the planting soil is filled back in the hole.  The daylily should be planted so that the crown is about one inch below the surface of the soil. 

Most daylily cultivars benefit from being divided every three to four years.  Some, like the Stella d’Oro, are vigorous growers and require dividing every other year to continue to perform their best.  Dividing daylilies really isn’t difficult, but there are a few tricks to make it easier and assure success.  We’ll talk more about those in my next blog installment.


Tuesday, August 13, 2013

More About Daylily Terms

Well, gosh.  Who would have known there is so much to know about daylilies that it almost entails learning a new language?  I sure didn’t years back when I walked up to one of the ladies from the daylily society and asked “Can you answer a few questions about daylilies for me?”  Could she ever, and her enthusiasm for this particular family of plants grabbed hold of me and stuck for all these years.

 And, I’ve learned a little bit of the language of daylilies – enough to help me select just the cultivar I need for any particular spot at Wiese Acres.

 We talked about scapes; bloom size, season, and habit; ploidy; foliage type; throats; and bud counts and branching.  Today we’ll talk about terms that describe the blossom itself.

 Here’s how another of my favorites is described in the AHS cultivar database:


'Strutter's Ball' (Moldovan, 1984)

scape height             28 inches
bloom size                 6 inches
bloom season           Midseason
ploidy                       Tetraploid
foliage type                Dormant
bloom habit               Extended
flower form:                Single

 Color: black purple with very small silvery white watermark and silky halo above small lemon green throat

 The fact that Strutter’s Ball is a tetraploid tells me that when it says the color is “black purple” it means that it is a true, deep, rich color.  The 6 inch bloom size tells me it is going to really stand out in my garden.  Since the scape height is 28 inches, I’m not going to want to plant it where anything tall will stand in the way of my view of this remarkable blossom.   Extended bloom tells me I will be able to enjoy each blossom for at least 16 hours before it fades away.

But, there are some descriptors here that we haven’t talked about yet.  What does “flower form” really mean?  The AHS uses this to describe the shape or structure of the flower.  It recognizes five different flower forms:  single, double, spider, unusual form, and polymerous.

Strutter’s Ball is a single flower.  This means that it has three petals (the upper part of the blossom); three sepals (the lower part of the blossom); six stamens and one pistil (the reproductive organs of the flower).  Double daylilies have extra layers of petals, giving it the appearance of a flower within the flower.  A spider is a flower whose petals are at least 4 times as long as they are wide.  These are usually very airy looking, loosely formed flowers.  An unusual form is a daylily where the petals or sepals have unusual characteristics, such as pinching or twisting.

 Strutter’s Ball has a watermark.  A watermark describes an area just above the flower’s throat which is lighter in color than the rest of the petal.

 An eye or eyezone refers to a darker colored area on the petals and sepals just above the throat.  The silky halo that is described in relation to Strutter’s Ball tells me that this blossom has a relatively small eyezone that is not really very distinct.  Silky tells me that it probably a very smooth transition with only slight variation from the lighter colors of the petals and sepals to the darker color of the eye.

 There are a few other terms used to describe flowers that do not apply to Strutter’s Ball.


Choo Choo Fantasy is a good example of a bicolor.  The top and bottom flower segments of a bicolor are completely different colors, in “Choo Choo’s” case,  rose pink petals and cream colored sepals.
 
 
There are also bitone daylilies, where the upper and lower segments  are different tints of the same color. A bitone has lighter sepals and darker petals.   A reverse bitone has the darker tones on lower sepals and lighter coloration on the upper petals.  A blend is a mixture of two or more colors, also referred to as polychromatic. 

A daylily, like Meadow Mist, that is referred to as having a complete self is one where the entire flower – petals, sepals, pistils, anthers, throat and all – are the same color.

Some flowers have a glittery appearance on the petal surface. When the sparkles appear white, they are called  diamond dusted; if they appear gold, they are referred to as gold dusted.  Apricot Sparkles is a diamond dusted daylily.


Every leaf, petal and sepal on a daylily has a midrib, the central lengthwise vein of the segment.  When a midrib is mentioned in a daylily description, it is usually because it is a different color than the rest of the petal or sepal and adds a striking feature to the blossom.  Apricot Sparkles has a faint cream midrib.


Now, of course, you can buy some beautiful daylilies that are perfect for your garden without knowing any of these terms.  But, I like to have a pretty good idea of what it’s going to look like before I go to the work of planting it.

We’ll get to the planting part on Thursday.

Thursday, August 8, 2013

More on Daylilies - Useful Terminology to Know

Not everyone has the desire to be a daylily hybridizer.  I'm one of those folks.  I don't have the patience to do a task one year and then wait several years to see if it results in what I hoped it would.  Many of the terms you'll find if you look at the dictionary of the American Hemerocallis Society (the organization that registers and tracks daylily cultivars), are only needed if you do desire to be a hybridizer.  There are a few, though, that it's handy to know just to understand exactly what you can expect from a daylily you purchase. 

Here is a daylily description from the American Hemerocallis Society's website:

Lynnabelle (Adams-Schock, 2005)
Scape Height:  28 inches
Bloom Size:      5 inches
Bloom Season: Midseason - Late
Ploidy:              Diploid
Foliage Type:   SEV
Bloom Habit:   Diurnal
Bud Count:      23
Branches:          3
Color:   cream yellow apricot polychrome with darker apricot eye and gold picotee edge above yellow green throat.

Without understanding a few basic daylily terms, it's really hard to know exactly what this daylily looks like, or even how it grows.

So, let's start with scape.  A scape is simply a flower stalk without leaves.  It's the long sturdy "blossom holder" of the daylily.  Low scapes are from 6 to 24 inches tall.  Medium scapes are 24 to 36 inches tall and tall scapes are taller than 36 inches.

Bloom size measures the diameter of the flower.  A miniature bloom size is under 3 inches in diameter.  Small blooms are from 3 to 4 1/2 inches and any bloom larger than 4 1/2 inches is considered large.

Bloom season tells us when in the summer blossom sequence this daylily is likely to bloom, but not exactly when it will bloom because that varies from location to location.  Bloom season is classified as Extra Early; Early; Early Midseason; Midseason; Late Midseason; Late; Very Late; and Rebloomer.  Midseason to Late tells us that Lynnabelle is going to start blooming towards the end of the peak of daylily blooms (Midseason) and into the late summer or fall.

Ploidy.  Now that's an interesting word and not one we are likely to use in everyday conversation.  Ploidy refers to the chromosomes in the plants.  Most plants  have two identical sets of chromosomes per cell and are known as diploids.  Tetraploids have four sets of chromosomes per cell.  Tetraploid daylilies usually have larger, more intensely colored flowers, with sturdier scapes and more vigorous growth.  Diploid daylilies are still the most common, especially in pink daylilies, as well as spider type and double daylilies, and provide many beautiful flowers and healthy plants.
 
We talked a little about foliage type or growth habit in Tuesday's blog.  As a quick refresher, SEV means that Lynnabelle is a semi-evergreen variety.  Other varieties are DOR or dormant and EV or evergreen. 
 
Bloom habit refers to when the blossom opens.    Most daylilies bloom for a single day, beginning in the early morning and lasting until the evening and are referred to as diurnalNocturnal daylilies open in late afternoon and close the following late morning or early afternoon.  Extended bloom refers to a daylily whose blossoms remain open 16 hours or more.  Extended bloomers may be diurnal or nocturnal in nature.               

Bud count often isn't included in a description you find at the garden center, but it is important to know if you want to fill your garden with the best of the best in daylilies.  Bud count is the number of buds, seed pods, and bud scars on a scape.  It's important because each blossom only lasts one day, so the more buds you get, the longer the bloom time for the plant as a whole will be.

Branches are the number of times a scape separates.  Lynnabelle typically has three branches per scape.  More branching means more buds and more buds mean more blossoms.  That's always a good thing.

Lynnabelle is a cream, apricot, and yellow polychrome color.  This means that there are at least three different colors (cream, apricot, and yellow, in this case) intermixed on each of the petals (the top three flower segments) and sepals (the bottom three segments).  The darker apricot eye means that there is a darker colored area on both the petals and sepals just above the throat.

The throat is the innermost center of the flower, where the pistils and stamens attach to the back of the flower.  The pistils and stamens are those threadlike projections that contain the pollen and reproductive organs of the flower. Lynnabelle's throat is a yellow-green color.

A picotee edge refers to an edge around the petals and sepals that is a completely different color than either the petals or sepals.  In Lynnabelle's case, the picotee edge is a golden color.

So, even though I understand what all these terms mean now, it's still helpful for me to see a picture.   Putting the photo together with what I know of its growth habits, number of flowers it's likely to produce and all the other information I have tells me pretty much exactly what to expect from this daylily once I have it in my garden.

And, if I ever have questions, I can easily ask, the "Schock" part of the Adams-Schock hybridizer team who created and registered this daylily. She lives just a ways down the road from me. Now how exciting is that to know the creator of one of the best producing daylilies in my garden?  And yes, I got my Lynnabelle directly from her.

We'll cover a few more terms in next week's blog.


Tuesday, August 6, 2013

Daylilies - An Introduction

People often ask me which plant in my garden is my favorite.  That’s a tough one.  I usually tell them I can’t name a favorite, although I have discovered a few that are not my favorites.  But, if forced to name favorites, daylilies would be sure to be on that list.
 

"Destined to See" daylily; EV; 24 inches tall, early bloom
Daylilies are tough, versatile, long-lived, low-maintenance, drought tolerant, and beautiful perennials.  I’m not sure you can ask for much more than that from any plant.  Add to that the fact that there are nearly 40,000 varieties of daylilies, which sport some pretty cool names, in virtually all colors except blue and pure white, and they are nearly irresistible.

Daylilies are not true lilies.  They are members of the genus Hemerocallis, which literally translated means day (hemera) and beauty (kallos), or “day of beauty”.  They came by the name Hemerocallis  or“daylily”, because each blossom, as beautiful as it is, lasts only one day.  A blossom typically opens in the morning, reaches its peak by mid-afternoon and begins to fade in the late afternoon heat, closing up by late that evening or early the next morning.  Some newer varieties have been bred to be a little more long-lasting, with the buds opening in the evening and remaining open until the following evening.  These night-opening cultivars also tend to be some of the most highly fragrant daylilies.

Brushed With Bronze, 24 inches; DOR
While it seems like a waste to plant something that will only bloom for one day, that’s just not true with daylilies.  High performing daylily cultivars put up many “scapes”, or flower stalks, with many buds per scape, and can produce several hundred flowers per season.    These scapes come in different heights, ranging from the miniatures that are less than a foot, to giants that reach heights of nearly four feet.  The flowers come with ruffled edges, plain edges, and  glittery,  diamond-dusted edges; they might have “eyes” in the center of the bloom and a throat which may be a highly visible different color from the petals.   Some daylilies have different color sepals (the bottom three segments of a dayliliy flower), and petals (the top three segments of the daylily flower)  on the same blossom and are called bi-colors.  Flowers range from tiny to gigantic; they may have curled under petals or long, narrow, spidery looking petals; some have double flowers.  Many of the newer hybrids are highly fragrant.  There is truly a daylily style and color for every taste.

There are also daylilies that bloom early in the season, in the middle of the gardening season, and those that bloom late into the fall.  There are some that bloom early and then re-bloom later in the season, although those are a challenge in northern climates.  Often, the growing season just isn’t long enough to allow that second bloom.  There are some that put up so many scapes and are reliable, early enough re-bloomers, that they appear to be “ever-blooming”, like the Stella d’Oro, Happy Returns and Rosy Returns cultivars.

 Daylilies also are distinguished by growth habit.  There are three classifications of growth habits:  dormant, evergreen and semi-evergreen.  These are listed in the daylily description as DOR, EV, or SEV.  In northern climates, dormant daylilies are the most reliable.  Daylilies of this class go completely dormant in cold weather.  They lose their foliage completely, usually just after frost.  They overwinter with foliage buds, called “resting buds”,  just beneath the soil surface and these foliage buds resume growth in the spring.  Because all signs of life are below ground in cold weather, these tend to tolerate the temperature extremes of northern winters better than semi-evergreen or evergreen types.

Evergreen daylilies retain their foliage throughout the year.  In our cold weather, this foliage looks like a pale green, somewhat slimy mass of tangled leaves.  They do not set the resting buds that dormant daylilies set and may be damaged by the extreme cold and the freeze and thaw cycles of northern winters.  For that reason, many northern daylily growers tend to avoid the evergreens, although hybridizers are working all the time to create a daylily that has the best of the evergreen traits but still withstands the nasty winters.

Semi-evergreens are daylilies that don’t quite fit either the dormant or evergreen categories.   Their foliage dies back partially but not completely, in warmer climates.   In reality, in my garden, most every daylily has a growth habit that appears to be dormant.  In the depths of winter, if I look at my daylily foliage, I generally only see black, frozen leaves with no signs of life.  In the spring, they all come back with nice, fresh green foliage.  In warmer climates, or even here in a very mild winter, where evergreen and semi-evergreen daylilies do not go dormant, they may look pretty ratty come spring, with a mix of cold damaged leaves, dead leaves and fresh spring growth.  I usually end up cutting all old foliage back to the ground, even if it did stay partially green over the winter. 

The key to successful over-wintering is not so much whether the foliage is able to stay green or not, but whether the crown is hardy to whatever zone it is grown in.   That said, I do find that my evergreens and semi-evergreens are a little slower to bloom than they might be in warmer climates – they need to play “catch-up” with the foliage that’s been damaged in the winter rather than start putting their energy into scapes and buds.

We’ll talk more about daylily terminology on Thursday.

Thursday, August 1, 2013

Juneberry Pie


Juneberry pies ready to wrap for the freezer - and one to eat
On Tuesday, I talked about growing juneberries.  Part of growing a great fruit and vegetable garden is using the produce your garden gives you.  After picking the juneberries, I used the majority of them for what our family considers the best thing to do with juneberries.  I made pies.  Our opinion is that using juneberries for things like jams and syrups is a waste of good berries, not because we don't like those things, but because you can make perfectly good jams and syrups out of many other fruits, and there is simply no substitute for a good juneberry pie.

So, I thought I'd share my recipe for juneberry pie.  I don't mean to brag, but there is juneberry pie in my history.  When I was in high school, I received the "Grand Champion" ribbon at the North Dakota State Fair for the juneberry pie I submitted as an exhibit.  That was pretty exciting, but I have a confession to make.  I've always suspected that I received that award, not because my pie was so much better than all the other submissions, but because it was juneberry.  Ah, well, I guess I'll never know for sure, but I still make juneberry pies with pride.

I use the "never fail" pie crust recipe my Mom taught me to make.  I wouldn't exactly say I've never failed with it, but all in all, it's a good, easy recipe.  The key is in getting the right combination of flour and water to make a nice, smooth dough that is easy to roll out but not so easy that the crust gets tough. 

Pie Crust:

2 cups vegetable shortening  
4 ½ cups flour
1 tsp. salt
1 egg yolk
ice cold water

Mix flour, salt and shortening with pastry blender.  Put egg yolk in a 1 cup measuring cup , beat slightly and fill cup to top with ice cold water.  Add to flour mixture.  Mix with 2 forks until mixture holds together.  You may need to add more water to obtain the proper consistency.  Divide into 5 or 6 equal portions.  Form into balls the proper size for the size pie tin you are using.  Roll out on floured surface.  You may wrap the balls tightly in plastic wrap, put them in a freezer container and freeze for later use. 

I've kept the dough frozen for about six months with good success.  One of these times, I am going to try rolling the dough into circles and freezing them that way so that I can take the rolled out crust and just drop it into the pan when I am in a hurry.  I am not above using the pre-rolled purchased crusts when I'm in a hurry, either.

Once the dough is prepared, you're ready to make the filling.

Juneberry pie filling:

6 cups cleaned and washed juneberries
1 T. lemon juice
3/4 cup sugar
2 heaping T. flour
2 T. butter


Place measured berries in a good-sized mixing bowl.; gently stir in the lemon juice.  In separate bowl, stir together the sugar and flour.  Pour over berries and gently mix.  I use a thin edged spoon so that the berries more easily slide over the edge of the spoon without being crushed. 


Place half the berry mixture in the crust that has been smoothed into the pie pan.  Cut the butter into small pieces and spread over the berries.


Pour the remaining berries over the top of the butter layer and top with a pie crust.  Seal the edges well.  I sometimes brush a small amount of water around the edges of the crust to make the two layers stick together better.  Juneberries create a juicy pie so tightly sealing the crust edges helps prevent your oven from being filled with run-over juice.


If you are going to bake the pie right away, cut vent holes in the top crust and sprinkle with cinnamon and sugar.  Bake at 375 for about 20 minutes to set and brown the crust; reduce heat and continue baking for another 30 to 40 minutes, until berry juice is bubbling nicely from the vent holes.


For freezing, do not cut the vent holes or sprinkle with cinnamon sugar.  Wrap the pie pan and all tightly in plastic wrap.  For extra protection, I wrap with two layers of plastic wrap and then a layer of foil to hold the plastic wrap in place.  For smaller pans, in place of the second layer of plastic wrap and foil, you can slip the entire pan into a freezer bag and seal tightly.  I always wrap with that first layer of plastic wrap so I can press it directly onto the crust.  That keeps frost from accumulating on the crust and making it soggy.  When you are ready to bake, partially thaw the pie, then bake as described above.  I do bake the frozen pies on the lowest rack in the oven, as that keeps the bottom crust from getting soggy.  You can keep the pies in the freezer for a year without losing any of the quality.

And enjoying a nice piece of juneberry pie fresh from the oven when it is snowy and cold outside is sure to make my husband think I am simply the best wife he could have possibly been lucky enough to have.