Thursday, January 30, 2014

Sweet Corn- Su? Se? Sh-2? What Does It All Mean?

Dad
My Dad loved to grow just about everything, but I do believe sweet corn was his favorite.  When I first started to help my Dad in the sweet corn field, what kind of  sweet corn to plant wasn't much of an issue.  I don't recall the variety name, but it was always Trojan brand.  That was the brand that produced the biggest, juiciest, sweetest ears.  Dad's sweet corn patch was always planted out in the fields, safely away from the field corn, but with plenty of space.  I also don't recall anymore how many acres he planted, but it seemed like the sweet corn field went on and on forever. 

When the corn was ready, word went out around the community, and people would come from all the neighboring towns to buy sweet corn by the bushel.  I was the youngest in the family, and by default, the job of selling that sweet corn fell to me.  People would drive in the yard, I'd leave a note on the door for future customers to come on out to the field, along with directions on how to get there, and I'd jump in with the customer and we'd go pick.  I remember the price going from $1.75 a bushel early on in my sales career to $3.75 the last year I was in charge of sales.  That kept me busy for a couple weeks just before school started each summer. 

That corn was a standard (su) cultivar.  It had the traditional flavor of sweet corn and that nice, crisp yet tender texture.  The downside of that corn was that when it was "ready", each ear lasted only a couple days in the field and then it started to get a little too firm and too starchy.  Once picked, it really was only at its best if cooked almost immediately.  In su cultivars, the sugars in the kernels begin to turn to starch right away and it quickly loses its sweetness.  Close to suppertime each day during corn season, I would hop in the 1936 Hudson Terraplane that was our farm knockaround vehicle, prop myself up on pillows so I could see over the top of the steering wheel,  and drive to the field to pick enough for a big kettle full of corn.  We'd clean that corn and throw it in a kettle of boiling water as soon as we got it home.  There was nothing like that corn, dripping with melted real butter and a little dab of salt and pepper.  Yum, yum, yum!

Times have changed though, and people no longer are able to guarantee that those ears of corn will be cleaned and cooked within minutes of picking.  So, new cultivars that hold their quality longer have been developed over the years.  These are the sugar-enhanced (se) and the shrunken-2 (sh-2) varieties.

The sugar-enhanced (se) cultivars have a higher sugar content than the su cultivars but not as high as the sh-2 cultivars.  The se varieties have a nice, tender kernel and retain their sweetness for longer after picking than standard varieties, making them more suited for commercial sales.  These varieties generally are planted about a week later than su varieties and can be stored for a couple days after picking.

The sh-2 varieties are called that because of the shrunken appearance of the seed when it is dried.  These are also known as the "super sweet" varieties.  The sh-2 varieties are about twice as sweet as su varieties.  They need to be planted later than even the se varieties, as they need warm soil temperatures to germinate.  The ears stay fresh in the garden longer than other varieties, as well as having a longer shelf life after picking, sometimes staying sweet for as long as a week after picking if kept in the right conditions.  The downside of the sh-2 varieties is that the kernels tend to be a little tough and they need to be isolated from all other corn varieties to keep from cross-pollinating.

Synergistic varieties are a combination of se and sh-2, with about 75% se kernels and 25% sh-2, combining the sweetness and keeping qualities of the sh-2 varieties with the tenderness of the se kernels.  Synergistic varieties also need to be separated from se and standard varieties.

All sweet corn varieties need to be isolated from field corn, popcorn and ornamental corn, but sh-2 varieties need to be separated from se and standard varieties by about 250 feet and out of the path of prevailing winds.  In the average home garden, this isn't always practical so the choice between the  sh-2 or the se and standard varieties needs to be made.  Personally, I prefer the se varieties because of the good sugar content while still having tender kernels.  The se varieties seem better for canning and freezing, as well.

I plant a variety of se and su varieties with varying maturity rates.  That way, we can enjoy that delicious fresh sweet corn for an extended period of time.  I have some old standby favorites that I plant every year.   "Bodacious" is my favorite se variety.  It produces ears with large, sweet, yellow  kernels in about 80 days.   Delectable is another favored se variety.  It is a bicolor, with white and yellow kernels, very sweet and tender.  It produces an average of two to three good sized ears per stalk and matures in about 84 days.  For an earlier se variety, I sometimes plant Sugar Buns, which matures in about 75 days, with 7 1/2 inch ears covered with sweet, creamy yellow kernels.

Early Xtra Super Sweet and Northern Xtra Sweet are sh-2 varieties that do well for me and produce very early, in about 65 to 70 days.  I like to plant just a small patch of this to get us started on the sweet corn season.

We plant the bulk of our corn to mature about the third week in August.  It's become a tradition that Wiese Acres throws a big barbecue supper and corn feed one Saturday evening during sweet corn time.  We invite about 150 people to share summer's bounty with us and enjoy a beautiful summer evening with good company, leisurely strolls through the gardens, and, of course, all the sweet corn we can eat, dripping with real butter and lightly sprinkled with salt and pepper.

Hmm.  My stomach is growling just thinking about it! 


Friday, January 24, 2014

Chasing the Winter Blah Away

It feels like it's been a long winter, and unfortunately, here in North Dakota, we have a long ways yet to go.  It's certainly been a volatile one so far... 40 degrees above zero one day; then 20 degrees below zero the next day.  We've had several episodes of freezing rain followed by snow and wind.  Oh, yes, we've had wind.  A few days ago, we had several hours of sustained winds at 50 miles per hour and gusts clocked at upwards of 75 miles per hour.  It's downright irritating.

There's something about being able to surround yourself with a sea of vibrant, growing green, though, that helps even the coldest, windiest day seem not quite so bad.  I love my four season room that allows me to do that.   This morning, I looked at the thermometer that hangs in my kitchen before going out to do my "chores" with the animals.  It showed negative 13 degrees.  Brrrr.  I headed to my four season room, where the temperature was a balmy 72 degrees, the humidity was a comfortable 55%, and the only wind came from the ceiling fan.  Now, that's my kind of climate.

Some of the plants are starting to show the strain of the short days of winter - leaves are looking a little pale, growth has slowed or stopped, and those sun-loving blooming plants are noticeably short of colorful blossoms.  Sometimes, when we are having a particularly gloomy stretch of days, I add some high intensity grow lights to help them along.  I set the lights on a timer for 12 to 15 hours a day and let the plants think that spring is closer than it really is.

The more shade tolerant plants seem to be doing just fine, and I'm pretty confident that those that are looking a little peaked now will perk up as the days begin to get noticeably longer and we leave the winter season behind and head into spring.  Until then, they are a whole lot greener than anything outside.


Friday, January 17, 2014

Over-Wintering Tender Roses Indoors

Each spring, I buy some cheap hybrid tea roses - you know the ones that come wrapped in sawdust and cardboard paper, then stuffed in a plastic tube?  I plant those in containers as my "thriller" and enjoy long-stemmed tea roses for the summer.  In the fall, I usually just let them die a natural death in the long, cold winter. 

Last spring I spent a little more on my container roses.  For my daughter's wedding, I purchased three more expensive roses:  Bride's Dream, Maid of Honor, and Promise.  They did beautifully and I decided they were worth trying to save.  Initially I planned to trim them back, remove them from the containers and bury the entire rose under several inches of soil, topped by a thick layer of mulch.  This is a process commonly known as the "Minnesota Tip" method and many rose gardeners in harsher climates swear by it. 

That plan didn't quite work out for me.  We had a nice, long Autumn and those roses stayed green and blooming throughout September.  Then, in early October, all my gardening plans got derailed by an early wet snow that caused extensive damage to many of our trees and resulted in many, many hours of clean-up work.  Before I knew it, the soil was frozen and there was no chance left to perform the "Minnesota Tip".

Most rose experts will tell you not to attempt over-wintering roses indoors.  They are prone to pests and disease and just don't do well.  Since I knew they were doomed for sure if I left them outdoors, though, I decided I had nothing to lose.  So, I brought them, pot and all, into the garage, where the temperature remains at about 50 degrees over the winter.  I placed them in a protected area where the frigid air that comes in when the garage door opens is less likely to reach them.

I trimmed the bushes back to about 10 inches, gave them a good bath with a sharp spray from the garden hose to knock off any hitch-hiking pests, and then set them up under grow lights on a timer for 15 hours per day.  I decided to be pro-active about pests and diseases, so I scratched a little bit of systemic houseplant pesticide into the top of the soil.  I watered them well and kept them spread far enough apart so there could be good air movement around each plant. 

Initially, I watered them about twice a month, keeping them a little on the dry side.  In early December, they started to grow.  Shortly before Christmas, I noticed that they were developing buds.  Since they clearly wanted to grow, I began watering more frequently.  To help the buds develop, I started giving them a basic rose fertilizer every other watering. 


Last week, I picked a bouquet of beautiful roses.  Let me tell you, that was a great feeling as the actual temperature outside was hovering around negative 20 degrees with wind chills creating a "feels like" temperature of negative 48. 


I don't know if this method will always be so successful but as of now, I have healthy, happy, blooming roses and I have great plans for them come spring.

Friday, January 10, 2014

Transplanting Orchids

Remember those orchids I just couldn't resist when I walked through the garden center last year about this time?  Well, they've been thriving and it appears it's time to give them a larger place to grow.

Orchids benefit from regular transplanting.  In their native environment, orchids are epiphytes, or air plants.  Their roots hang from trees in the jungle, exposed to air and high humidity.  When potted, they need to be in a mix that allows lots of air to get to the roots and retains moisture without being "soggy".  As potting mix decomposes, it packs in more tightly around the roots and limits the amount of oxygen that is available to the roots.  As it decomposes, it also retains more water and may cause root rot.

If an orchid's health begins to decline, it is likely in need of repotting.  Repotting does stress the orchid, so it's best to not allow the decline to become too marked before making the decision to repot.  Another indication that it's time to repot an orchid is when you see the roots begin to climb out and spill over the sides of the pot. 

The best time to replant an orchid is after it has completed its bloom cycle and is starting to put out new root growth.  It's not advisable to transplant plants when they are in bloom, but if the potting medium is worn out and retaining too much moisture, it might be better to take the risk of losing a few blooms than to risk losing the entire plant.

Using the correct potting medium for the type of orchid is important.  The potting medium is what encourages root health, and no matter how beautiful the leaves of the orchid may look, if it does not have a good, healthy root mass, the orchid will not produce the beautiful flowers that we covet.  Orchids can not be planted in regular potting soil.  The most common potting mediums are a mix of bark or coco husk chips, charcoal, and vermiculite or aliflor (a lightweight clay type material).  Orchids can also be planted in peat moss, but watering must be done very carefully with this type of medium as peat moss holds more moisture for longer periods of time.  Once the correct potting medium is chosen, it should be soaked overnight before using it for transplanting.  This will give the orchid roots a nice, moist environment right from the start.

 Orchids do not like to be in too large a pot.  If the pot is too large, there aren't enough roots to absorb the moisture from the potting mix, causing it to stay too wet for too long.  Unlike many other plants, an orchid won't increase root growth to take up the extra space and  moisture.  Too much pot space leaves the roots setting in a soggy mess and at risk of rotting.  An orchid that is in the correct size pot should dry out and need watering about once a week.  If you are watering with the recommended amount of water and the potting medium is staying wet for much longer than that, it is probably in too large a pot.

The root ball should be nice and wet when removed from its pot for transplanting.  This will help loosen the roots from the sides of the container and loosen the potting medium from around the roots.  This can be accomplished by soaking the entire pot in room temperature water for a few hours before attempting to remove them from their containers.

Once the roots and potting medium are good and wet, lift the entire root mass gently upward.  If roots are still clinging to the sides of the container, use a very sharp, clean knife to run around the inside of the pot to loosen them. 

Once you've removed the orchid from its current pot, you'll be able to tell if it needs a larger pot or not.  If all the roots are in good condition and fill the pot, then it is probably ok to go up one pot size.   If the roots are in poor condition, they should be trimmed and put back into the same pot size.  My orchids were in 4 inch pots, with nice, healthy roots, so I transplanted them into 5 inch pots.


The old potting medium should be gently loosened from around the roots.  The roots should be rinsed with clean, room temperature water  and any unhealthy roots trimmed away with a sharp scissors or knife.  In the photo with the loosened roots, you can see that the ends of some of the roots had lost their nice green color and turned almost white.  This indicates that those root ends had been receiving too much water.  Those were trimmed back to the nice, healthy, firm green part of the root before transplanting.

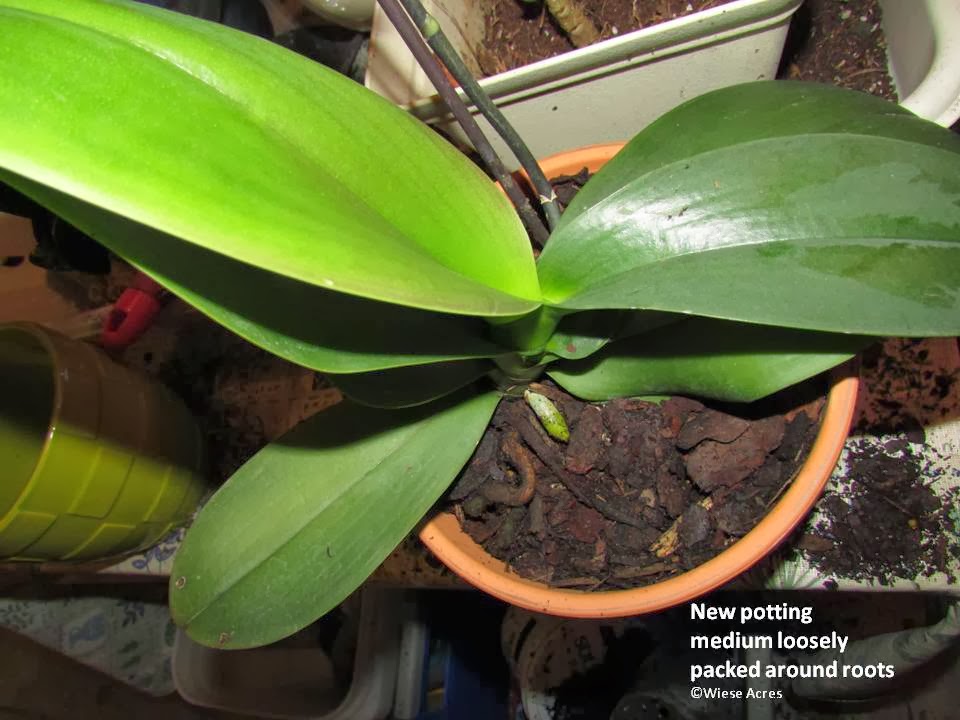
I put a thin layer of potting medium on the bottom of the new pot and then spread the roots evenly around the pot.  Some sources suggest using broken pot shards or gravel, but this isn't really necessary if you have a shallow, well-draining pot.  The orchid should be planted at the same depth it was in the old pot and more or less potting medium can be added to the bottom of the container to accomplish this.  Fill potting medium in around the root mass, gently pushing medium between the roots with your fingers.  Fill around the edges of the pot until the orchid no longer "wiggles" in the pot.  The roots need to be secured in the potting medium to encourage new growth.


A stake should be used to support any flower stalks or floppy leaves to avoid movement that places stress on the root mass. 


The newly transplanted orchid should be set in a protected place out of direct sunlight for a week or so after transplanting.  After that, it can be moved back into a location with bright light but not direct afternoon sun and watered normally.   Then watch for the new flattened stems with the little "mittens" on the end - that's the flower stalk that will soon be covered with blossoms.


Friday, January 3, 2014

Amaryllis for Valentine's Day

Most people view amaryllis (Hippeastrum spp.) as a Christmas season plant and they do beautifully in that capacity. I like to spread my winter color out a bit, though, so I concentrate on the readily available beautiful poinsettias for Christmas and coax my amaryllis bulbs to put forth their best efforts around Valentine's Day.

That means I need to start preparing them right around Christmas time. Generally, an amaryllis will put forth new growth within a week or so after planting and bloom within about six to seven weeks. They are easy to grow and bloom beautifully for a period of several weeks, with each individual blossom lasting up to a week.

 Amaryllis bulbs can be saved from year to year. When they finish blooming,  continue to water and fertilize them regularly and as soon as all danger of frost is gone, move them to a sheltered spot outdoors.  Continue to water and fertilize them regularly throughout the growing season. When hard, killing frost is predicted in the fall, bring the potted amaryllis in, place them in a cool, dark spot and stop watering them. Once the foliage has gone dormant, trim it off and store the bulbs for about a six week rest period.  

Around Christmas, bring the bulbs out of storage. If the bulbs are not crowded in their pots, add a top-dressing of compost to the pot, just enough to fill the container to within about one inch from the top and still leave about the top one-third of the bulb exposed.  Place the pot in a warm, sunny location, and begin watering regularly. If the bulbs are crowded, or the soil is very compacted, they should be re-planted.

Remove the bulbs from the old container, shake off the old soil and prune any roots that are not nice and plump, solid and white.  Sometimes, there will be smaller bulbs growing around the sides of the old bulb.  These bulbs can be gently separated from the parent bulb and potted on their own.  They may not bloom the first year or so, but eventually you will have another beautiful amaryllis plant.


The bulbs should be planted in a container large enough to allow the roots to be spread nicely.  The circumference of the pot should allow about 1 to 1 1/2 inches on all sides of the bulb.  Fill the container about 1/3 full of good quality potting soil, then place the bulb on top, spreading the roots on top of the soil.  Cover the roots carefully and fill the container with potting soil until only the top 1/3 of the bulb is exposed.  The small "baby" bulbs can be planted individually or in groups in container, following the same procedure as for the parent bulbs.


After planting, water and place the container in a warm, sunny location and wait for the flower stalk to emerge within a few weeks.  Typically, the flower stalk emerges before the leaves begin to emerge and the flowers will bloom a few weeks later.